PS3 Recovery Menu
The PS3 Recovery Menu or, "PS3 Safe Mode" as it is called by Sony, was introduced with the Firmware 2.50 upgrade and can be a powerful tool when you are having various difficulties with your console.
Sony did an excellent job with the PS3 Recovery Menu. The tools it provides will give you the ability to fix corrupt system files, upgrade your firmware, restore the HD database and much more. It is a powerful tool and several features should be used with caution as they can remove all your settings, as well as all of your saved information.
Accessing the PS3 Recovery Menu (Safe Mode)
With the system in standby mode. Press and hold the power button down until the system turns on and then off again. Release the power button. Very important to hold the power button until the console shuts off and to release the power button before continuing to step 2.
After about 1 - 2 seconds press and hold the power button again, until you hear 2 consecutive beeps. Release the power button. During this step you will actually here three beeps. There will be one single beep then a short delay followed by the 2 consecutive beeps. Only release the the power button after the 2 consecutive beeps.
You will then be instructed to plug in a controller, via the usb cord, and press the PS button.
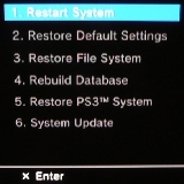
At this point the PS3 Recovery Menu will be shown on the screen.
Important Note
If possible, backup all of your data before using any of these features. Any of the following features can eliminate data if they find corrupt files and, some erase data as part of their function.
PS3 Recovery Menu Options
Restart System
This option boots your system as normal without changing any settings or files.
Restore Default Settings.
Restores all default settings on the PS3 for networking, clock, video, etc. For a full list of the restored settings you can look under settings> system settings > restore defaults on your console or you can check out the XMB section on our site. This should not eliminate your game saves or other saved content, including your user login.
Restore File System
This will rewrite the files the PS3 uses to boot. This feature will help if files have become corrupted and are not allowing the console to boot as normal. This should not erase any of your saved data or settings.
-
Rebuild Database
This can be a usefull feature if you have lost files on your system for no apparent reason. Try using this feature to see if it can restore those files. This will also rewrite corrupted files within the database, potentially eliminating future issues. This feature should not erase any of your saved data or settings.
RESTORE PS3 SYSTEM
This will restore your system to original including, formatting and erasing all of the data on the HD and returnig all system settings to default. This will not take your system back to a previous Firmware release. Use this option as a last resort, unless you have nothing on the console that you want or you want to erase everything on the console, do not use this option.
-
System Update
This will allow the user to update their console with new firmware via a Flash drive or other portable media. This will not allow you to update via an internet connection. This can usefull if your system has become corrupted to the point you can not boot. You will need a portable media device with the correct firmware and in the correct file structure to complete the upgrade. For further information on using portable media to upgrade your system please see our section on upgrading your Firmware.
Important Note
If you have a system that will not reset the video via normal means, try activating the recovery menu. We have found that occasionaly this will fix the problem with your video settings.